About Me

- 6060
- I am a mom of two. I love amigurumi and colorful yarns. I will try to help you as much as I can if you have questions about plastic safety eyes and noses. Have fun knitting and crocheting!! The HEART behind the Eyes - Clara
Handpainted Eyes

Hand Painted Eyes by clara
Subscribe 6060


 Posts
All Comments
Posts
All Comments
Showing posts with label craft. Show all posts
Showing posts with label craft. Show all posts
Wednesday, December 31, 2008
WackyJacky - Toys in the Attic
 1:34 PM | Posted by
6060
1:34 PM | Posted by
6060
Jacky came to me about 6 months ago asking about big eyes!! That's how I knew about "Toys in the Attic" truly means!
She is truly a very talented critters designer. She creates and hand made all these attic monsters by herself. Aren't they all look like the one you have imagined when you were little? lol (Except these may be a lot cuter!!)
She also hand painted her eyes to match her critters. Her critters are very unique looking. You can't find there anywhere! All the monsters she made are in very good sizes. With the price she offers in Etsy, these are a must have if you like monsters in your attic! :D
Visit Jacky's shops: WackyJacky.etsy.com and sockmonstahs.com


 Labels:
21mm eyes,
big eyes,
craft,
critters,
doll,
example,
handmade,
handpainted,
monsters,
plastic eyes,
round eyes,
safety eyes,
soft toys,
WackyJacky,
wackyjacky.etsy.com
|
Labels:
21mm eyes,
big eyes,
craft,
critters,
doll,
example,
handmade,
handpainted,
monsters,
plastic eyes,
round eyes,
safety eyes,
soft toys,
WackyJacky,
wackyjacky.etsy.com
|
 1 comments
Saturday, August 9, 2008
Plastic safety eye sizes

 I put together a picture of different sizes of safety eyes to let you see which size is better to fit your amigurumi or knitted toys! Any question please leave a message to me. Thanks! Clara
Labels:
6060,
6060.etsy.com,
Amigurumi,
amigurumi eye,
craft,
craft eyes,
craft supplies,
craft supply,
display,
etsy,
eye,
illustion,
plastic eye,
plastic eyes,
round eyes,
safety eyes,
sizes
|
3
comments
I put together a picture of different sizes of safety eyes to let you see which size is better to fit your amigurumi or knitted toys! Any question please leave a message to me. Thanks! Clara
Labels:
6060,
6060.etsy.com,
Amigurumi,
amigurumi eye,
craft,
craft eyes,
craft supplies,
craft supply,
display,
etsy,
eye,
illustion,
plastic eye,
plastic eyes,
round eyes,
safety eyes,
sizes
|
3
comments
Sunday, April 27, 2008
Installation of Safety Eyes Instruction
Installation of Safety Eyes Instruction
By Clara (6060.etsy.com & 6060eyes.artfire.com)
3/28/2009 updated
Usage of this document:
 1. Place the safety eyes into the holes and check to see if they are in the right place.

 4. Holding the washer fluted side up, slide it on to the eye post.


 If you use the little black safety eyes, installation will be the same as the 15 mm eyes.
  Remember to MAKE SURE the eye is in the right place. Push the washer fluted side up towards to the back of the eye.
 This is the finished look of a 6mm black eye installed as a cat nose!
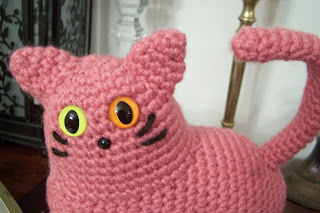 With all the parts together, my cat finally can see and smell.
I hope this document helps you to understand how to put the eyes on your critters and creations. Thank you and enjoy!


By Clara (6060.etsy.com & 6060eyes.artfire.com)
Usage of this document:
Do not distribute this document or sell this document by any means. The intention of this document is to show crafters how to install the safety eyes. Thank you.
Suggestion:
1. Make sure the eyes are located in the right place; once the washers are in, it is very hard to pull them back out again.
2. If you are using material like fabric, vinyl and leather, enlarge the hole a little by poking a needle (yarn needle/ skewer/ large sewing needle/ knitting needles, etc) through the material first.
 1. Place the safety eyes into the holes and check to see if they are in the right place.
2. Once you think they are in the right place, you can start the process of placing washers at the back.

3. This is the back side of the safety eyes.

(Again, MAKE SURE the eye is in the right place. Once you push the washer to the back of the eye, it will be extremely hard to remove).

5. Apply even pressure with both thumbs to slide the washer down the eye post.

This is the finished look of two 15mm cat eyes placed on my crocheted animal.

 Remember to MAKE SURE the eye is in the right place. Push the washer fluted side up towards to the back of the eye.

Clara :)
******************************
If you need more help because you have arthritis, please click the link above.
I have couple more suggestions for you.
******************************
Updated: Plastic eyes/noses washers

Bear Joints:

Other critters I have made:


Wednesday, February 20, 2008
Wire Headband for my Blythe
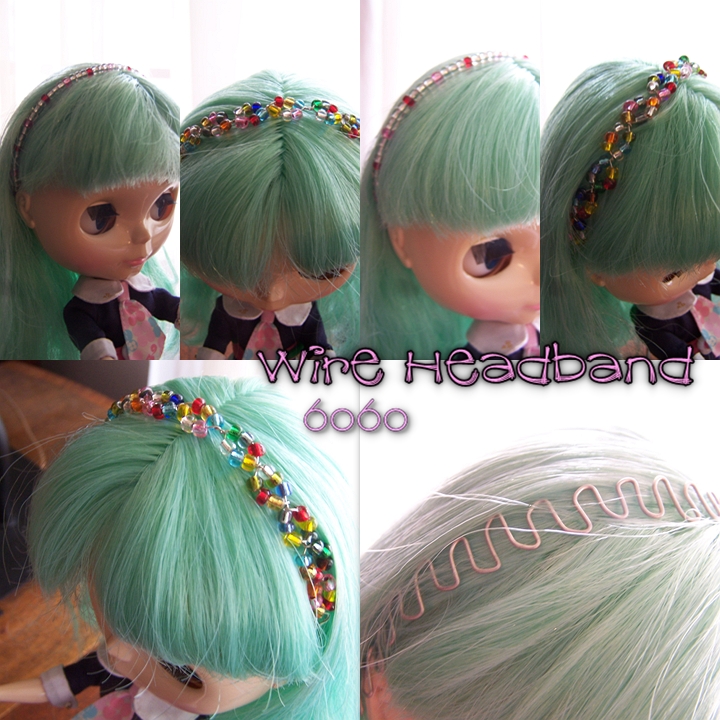 I read willynillywaterlily's blog about making a headband by using beads and wire. I really like to make one for my Lily too, but I know nothing about bending wire or working with wire. :D
So I went to the store and got crafty wire, it didn't say what gauge it was, I just got it and thought it would be alright. However, it wasn't strong enough to hold the headband down on Lily's head. Then I went to the hardware dept and got myself some thick wire, my hubby said if I couldn't use it, he could (good to know). Thus I got this 20-22 gauge wire and it worked, it bended and stayed on Lily's head. I was happy. :)
Because of this little project, it got me interested in the wire beading a little more, therefore, without reading anything, I made more headbands with more beads, well .. at the end I didn't know how to end the wire, so I just made a little loop and called it the end. I went to the library and borrowed a book about wire beading and hopefully I will learn more about this. So far, the headbands weren't too pretty, but I did try.. haha.. I hope I will make more prettier headband in the future for Alla and Lily. :)
I read willynillywaterlily's blog about making a headband by using beads and wire. I really like to make one for my Lily too, but I know nothing about bending wire or working with wire. :D
So I went to the store and got crafty wire, it didn't say what gauge it was, I just got it and thought it would be alright. However, it wasn't strong enough to hold the headband down on Lily's head. Then I went to the hardware dept and got myself some thick wire, my hubby said if I couldn't use it, he could (good to know). Thus I got this 20-22 gauge wire and it worked, it bended and stayed on Lily's head. I was happy. :)
Because of this little project, it got me interested in the wire beading a little more, therefore, without reading anything, I made more headbands with more beads, well .. at the end I didn't know how to end the wire, so I just made a little loop and called it the end. I went to the library and borrowed a book about wire beading and hopefully I will learn more about this. So far, the headbands weren't too pretty, but I did try.. haha.. I hope I will make more prettier headband in the future for Alla and Lily. :)
Subscribe to:
Posts (Atom)
LinkWithin


.png)


My Fav

Agne's Artfire Store

stitchnfrog's pattern

theitsybitsyspider's pattern - baby owl