About Me

- 6060
- I am a mom of two. I love amigurumi and colorful yarns. I will try to help you as much as I can if you have questions about plastic safety eyes and noses. Have fun knitting and crocheting!! The HEART behind the Eyes - Clara
Handpainted Eyes

Hand Painted Eyes by clara
Subscribe 6060


Showing posts with label usage. Show all posts
Showing posts with label usage. Show all posts
Sunday, April 27, 2008
Installation of Safety Eyes Instruction
Installation of Safety Eyes Instruction
By Clara (6060.etsy.com & 6060eyes.artfire.com)
3/28/2009 updated
Usage of this document:
 1. Place the safety eyes into the holes and check to see if they are in the right place.

 4. Holding the washer fluted side up, slide it on to the eye post.


 If you use the little black safety eyes, installation will be the same as the 15 mm eyes.
  Remember to MAKE SURE the eye is in the right place. Push the washer fluted side up towards to the back of the eye.
 This is the finished look of a 6mm black eye installed as a cat nose!
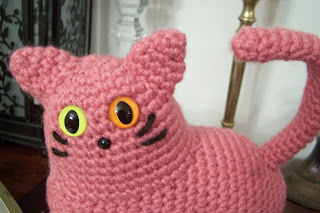 With all the parts together, my cat finally can see and smell.
I hope this document helps you to understand how to put the eyes on your critters and creations. Thank you and enjoy!


By Clara (6060.etsy.com & 6060eyes.artfire.com)
Usage of this document:
Do not distribute this document or sell this document by any means. The intention of this document is to show crafters how to install the safety eyes. Thank you.
Suggestion:
1. Make sure the eyes are located in the right place; once the washers are in, it is very hard to pull them back out again.
2. If you are using material like fabric, vinyl and leather, enlarge the hole a little by poking a needle (yarn needle/ skewer/ large sewing needle/ knitting needles, etc) through the material first.
 1. Place the safety eyes into the holes and check to see if they are in the right place.
2. Once you think they are in the right place, you can start the process of placing washers at the back.

3. This is the back side of the safety eyes.

(Again, MAKE SURE the eye is in the right place. Once you push the washer to the back of the eye, it will be extremely hard to remove).

5. Apply even pressure with both thumbs to slide the washer down the eye post.

This is the finished look of two 15mm cat eyes placed on my crocheted animal.

 Remember to MAKE SURE the eye is in the right place. Push the washer fluted side up towards to the back of the eye.

Clara :)
******************************
If you need more help because you have arthritis, please click the link above.
I have couple more suggestions for you.
******************************
Updated: Plastic eyes/noses washers

Bear Joints:

Other critters I have made:


Subscribe to:
Posts (Atom)
LinkWithin
.png)
My Fav

Agne's Artfire Store

stitchnfrog's pattern

theitsybitsyspider's pattern - baby owl